ELECTRICAL MAINTENANCE TRAINING COURSES
WHO SHOULD ATTEND
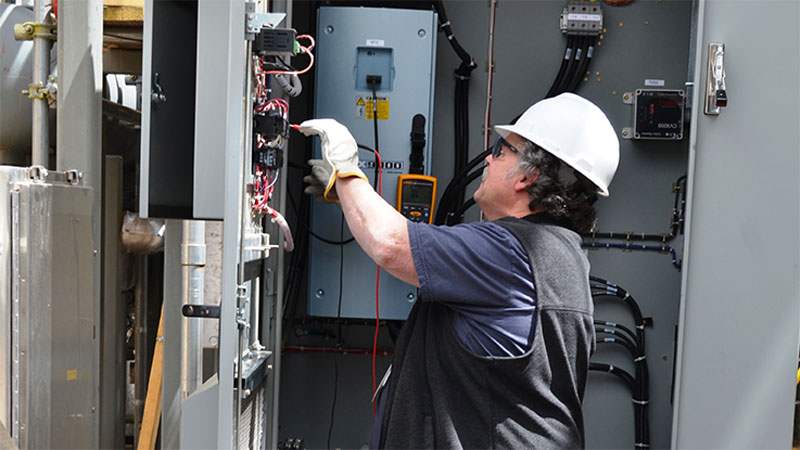
This hands-on course is intended for apprentices, technicians and engineers responsible for the maintenance and testing of industrial and utility substations.
LEARNING OBJECTIVES
To receive 2.8 CEUs, participants must attend 4 days of class (28 contact hours) and must have attained a minimum grade of 80% in the virtual SCTI final exam. Upon completion of this course the participant will demonstrate that he/she is able to:
• Perform AC and DC electrical testing in accordance with, manufacturer’s recommendations, NETA 2019, and IEEE standards.
• Analyze and interpret results.
• Carry out measurements and adjustments.
• Recognize key lubricating components, and cleaning measures to avoid equipment malfunction.
PREREQUISITES
Participant must have taken the Substation: Components, Testing, and Interpretation virtual class and passed the exam successfully.
REQUIREMENTS
Students must wear long pants and safety toe shoes to complete the lab portion of this course.
This course provides an overview for apprentices, technicians and engineers responsible for the maintenance and testing of industrial and utility substations. Hands-on labs are a major part of this course to help the technician locate weak or faulty components in the substation systems. Course focus is on medium voltage circuit breakers (air and vacuum), and switchgear. The course is designed to aid skilled qualified substation maintenance technicians in the safe performance of substation component preventative maintenance
LEARNING OBJECTIVES
Upon completion of this course, the participant should be able to:
Explain the configuration and function of common equipment found in a substation.
Identify components of air, oil and vacuum circuit breakers, and metal-clad switchgear (including switchyard equipment).
Use medium-voltage circuit breaker and switchgear manufacturer’s instruction manuals and NETA specifications to:
Perform and interpret results of all required tests.
Verify measurements and make adjustments to mechanisms as required.
Electrical Maintenance
PROGRAM DESCRIPTION
The Electrical Maintenance program is unique in that it covers an array of employment opportunities in the electrical field. Electrical maintenance workers understand electrical theory in its many diverse applications from residential and commercial construction and maintenance to heavy industrial power and control installations. They apply the latest technology and codes to diagnose, test and repair electrical equipment including appliances, motors, generator, distributors and control circuits.
EMPLOYMENT OPPORTUNITIES
Graduates will qualify for employment with processing companies, industrial firms, large and small manufacturing companies, electrical contractors, power companies and building construction companies. They may choose to do general electrical maintenance, install power and lighting systems or work in instrumentation, automation, and solar/wind.
ACCREDITATION
Satisfactory completion of an approved two year electrical program fulfills the one year’s experience credit allowance (2000 hours) for a Class A journeyman electrician, power limited technician, or maintenance electrician license.
Electrical Maintenance Lead
The Day Shift Maintenance Lead is responsible for effectively maintaining critical production equipment by supervising activities of a crew with 7 to 13 Maintenance Associates.
*State LME license, Minimum
*Experience with Manufacturing or Lumber Industry
*Experience programming PLCs would be helpful
*Have equipment maintenance or related experience.
*Must complete in house Maintenance Assessments or Continue Education Program
*Willing to progress in getting Electrical Supervisor License
*Basic Computer skills.*MS Word, Excel, Outlook a plus
JOB DUTIES:
Manage concurrent maintenance activities in order to effectively maintain industrial manufacturing equipment and facilities on a 7-day/week, 24-hour basis.
Manage daily shift schedule to complete preventive maintenance activities and prioritize break-in work according to established critical equipment list.
Procure parts, supplies, and services used in day to day maintenance activities.
Perform data recording for equipment downtime, failure analysis.
Perform administrative duties such as time and attendance, lead monthly crew safety meetings, and conduct behavior based safety observations for creating a team environment.
Help maintenance Associates meet annual safety training requirements, continuing education for licensing, and adhere to all government regulations as well as Company policies and procedures.
Manage special projects as directed by Maintenance Manager.
Develop, educate, and guide crew in proper maintenance direction.
Help develop training plans to improve Associate skills.
Maintain hydraulic and pneumatic equipment
Fabrication, welding and cutting
Communicate with vendors
Drive Forklift
Some overtime hours as needed
PHYSICAL DEMANDS/WORK ENVIRONMENT:
Ability to occasionally lift and/or move up to 50 pounds.
Ability to frequently walk and/or stand for prolonged periods of time.
Ability to occasionally bend, squat and/or stoop.
Manual and finger dexterity as required to perform daily job duties.
Frequently works near or around moving mechanical parts.
Exposed to a high level of noise in the work environment.
Exposed to airborne particles.
Work environment Wood processing, manufacturing operation.
Occasionally exposed to outside weather conditions, including variations in temperature and precipitation.
Electrical Maintenance
COMMERCIAL
Electrical Maintenance is well-versed in meeting the electrical requirements of commercial businesses within Auckland. We handle everything from refurbishment projects to the installation of newer, more energy-efficient systems. Improving your business’s lighting, heating, and cooling systems can save you a lot of money in the long run. To ensure that they will last, our electricians in Auckland offer regular maintenance and inspections.
commercial services include:
Servicing New and Existing Buildings
Offices, Warehouse, Retail Shops
Monthly Maintenance
Service Repairs
RESIDENTIAL
Homeowners greatly benefit from increased energy efficiency and electrical safety. Low energy bills mean that you will also save money. We ensure that all your electrical systems and appliances meet electrical requirements. After all, keeping your homes and businesses safe is our number one priority.
handle all of the complex wiring needed to get your home systems working. We strive to provide quality residential services, which include:
New Home wiring
Electrical Installations
Hot Water Repairs
Electrical Repairs and Maintenance
ELECTRICAL MAINTENANCE AND INSTALLATION OPERATIVE
Electrical Maintenance and Installation Operative is a multi-skilled operative able to carry out both the installation of equipment (e.g. street lighting columns, traffic signal poles) and the maintenance of that equipment (e.g. correcting faul ts when equipment is non-operational, changing lamps upon or close to failure).
There are many sub-sectors within the highways electrics sector – e.g. street lighting, traffic signals, safety cameras, and highway communications. Each uses different equipment and processes, and the apprentice will choose one of these depending on the specialism of their employer. The general duties, skills, competencies and behaviours are common across the sub-sectors but the detail and application is sub-sector specific depending on the sub-sectors chosen (e.g. the installation of traffic signal poles is different to the installation of lighting columns, but the principles of safe excavation and safe wor king are common)
Occupational profile
The main duties and tasks of someone who is a competent Highway Electrical Maintenance and Installation Operative within the relevant sub-sector(s) are to:
Install & maintain highway electrical support structures, equipment and systems (e.g. excavating and installing streetlight posts in the ground, installing traffic signal or safety camera poles, fitting Streetlighting lanterns or traffic signal heads, carrying out first line fault finding when items are reported as not working, carrying out routine replacement of lamps )
Carry out first line (i.e. first on site) emergency attendance and emergency works (e.g. after a road traffic incident where a vehicle hits a streetlight ensuring the site is safe for traffic and pedestrians)
Carry out work efficiently, effectively and safely to keep costs within budget, ensure works are completed in accordance with drawings, specification of works and instructions given by an experienced worker or manager and within the specified time duration to avoid delays and accidents
Maintain effective working relationships with colleagues, managers and members of the public whilst carrying out the works
Work on their own initiative and in small teams (which consist typically of 2 people) Optionally: Apply surface protection
Requirements: Knowledge, Skills and Behaviours
This is the core of the Apprenticeship standard. The knowledge and skills that are required by employers for competent Highway Electrical Maintenance and Installation Operatives are shown below
The typical duration of this Apprenticeship is 24 months for achievement of competence in the sub-sector chosen (e.g. streetlighting, traffic signals)
Entry requirements
Individual employers will set the entry requirements for this apprenticeship but typically candidates will have completed the Level 2 Highway Electrical Maintenance & Installation (HEMI) operative apprenticeship successfully and their Level 2 Certificate in Highway Electrical Work will be in date. Where the Level 2 HEMI has not been completed and the apprentice is following the Level 3 apprenticeship upskilling route, there is a requirement for the provider to carry out a training gap analysis to ensure that the required level of underpinning knowledge has been acquired before the programme start. The Provider will be required to review, plan and execute the required level of knowledge training in line with the Highway Electrical Vocationally Recognised Qualification Specification.