The Process Of Installing Laminate Flooring On Concrete
The installation process will vary according to the type of laminate planks and tiles you choose. They can be floated on the subfloor, for instance, if they have a click-lock system. Here are a few things you will need for the installation:
- Floorboards: Buy 10% more square footage of floorboards than is necessary to ensure you have enough in stock in case of wastage.
- Underlayment: The underlayment should be chosen keeping in mind the installation method as well as the room’s subfloor.
- Tools and accessories: Saws, rubber mallets, tape measures and pencils are basic tools you will need on hand, even if you are hiring professionals for the installation.
- Adhesives and nails: Whether you need adhesives specifically designed for laminate flooring installation or nails depends on the installation method you choose.
If you have tongue and groove planks, all you need is a rubber mallet and proper underlayment. The laminate boards have to be placed and click-locked with each other starting from any corner. You may need to cut and shape the planks near the edges of the room for better support.
- Start installing laminate flooring by matching their tongue with the groove. Apply firm pressure when pushing the planks together.
- During installation, make sure you leave an expansion gap of 1/4″ on all sides. Here’s a tutorial on how to install laminate flooring.
- Read through the manufacturer’s recommendations before starting the installation process.
- Make sure that your concrete subfloors are in perfect condition in order to get flawless laminate floors.
- Remember that concrete slabs are not immune to moisture. Take all necessary precautions to ensure a smooth installation.
Before starting this step, prepare the subfloor and lay the underlayment carefully.

When will I need to use a moisture barrier when installing laminate flooring?
All laminate flooring requires an underlayment to allow the floor to float and give the locking system its strength. Sometimes the underlayment is already attached for you, but you may hear the term moisture or vapor barrier when installing laminate flooring. You may be wondering if you will need to use a moisture barrier. Depending on your subfloor and project, you will need a specific type of underlayment.
You will need a moisture barrier underlayment when installing:
- On a cement subfloor
- On any subfloor that has a chance of moisture coming up and soaking into the flooring
Moisture barrier underlayment acts as a blockade between the subfloor and laminate to protect your floor from any moisture damage. It really is as simple as it sounds!

How to Lay Down a Moisture Barrier
New hardwood or laminate flooring can give your home a whole new look and feel. When you put in new hardwood or laminate flooring, it is important to first install a moisture barrier, which will protect the new floor from water damage caused by condensation or leaks on the subfloor. This is especially important in basements. Failing to take this important step will leave your beautiful new floor vulnerable to mold and warping, shortening the life of your floor and forcing you to redo your work.
- Roll the moisture barrier onto the floor lengthwise. Leave at least 2 to 3 inches on each side, which will overlap against the wall.
- Overlap the next row by 3 to 8 inches, depending on the manufacturer’s instructions.
- Seal the seams with a moisture-resistant tape all the way down the length of the row.
- Repeat these steps until the whole floor is covered.
- Overlap the seams between pieces of moisture barrier along the length of a row using the same overlap, and seal them with the tape.
- Trim any excess moisture barrier along the wall with a utility knife once the new flooring and and trim are installed.

How to Lay Out Laminate Flooring
Laminate flooring has a lot going for it — its ease of installation, versatile appearance, durability and cost. Laminate is significantly easier to keep clean and dust-free than carpet and is extremely long-lasting when properly cared for. Formed from layers of wood and melamine plastic, its appearance rivals that of genuine hardwood flooring and its durability means in high traffic areas, you don’t have to worry about a genuine wood floor getting damaged — all for approximately two-thirds the cost of real wood.
- Stack the opened planks of laminate in the room where they will be laid 48 hours prior to beginning the project. Set the thermostat to the normal temperature for the room to allow the flooring to adjust to the temperature and humidity.
- Measure the width of the room and divide this by the width of the plank. The idea here is to ensure the last plank that is laid is a minimum of 2-inches wide. If the last plank will not be a minimum of 2-inches, the first plank that’s laid will need to be trimmed a little.
- Cut the tongues off the first row of planks using a table saw. Take the first plank that will form the start of the second row, measure the length and mark the center point and cut in half. This is to offset the layout so the ends of neighboring planks aren’t level with each other.
- Lay the underlay if required. Some laminate flooring has underlay attached to each individual plank, others require the underlay to be rolled out separately.
- Take the first, full length plank with the tongue removed and position it on the floor with the groove facing in. Take the first piece of the second row that you cut in half and lay it next to the first plank. Snap the tongue of this piece into the groove of the first piece.
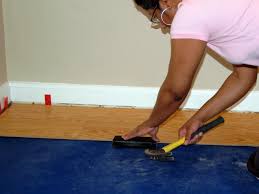
- Snap the next two planks into the ends of the first two. Continue until you reach the end of the row, place a 2-inch spacer against the wall and measure and cut the last plank to fit in the gap. Slide the completed two rows into place against the wall using a hammer and block. Continue assembling rows across the room.
Little-Known Secrets of Laminate Floor Installation
The Connection Points are Delicate
Unless you are using high-end laminate, the tongue and groove system which holds the whole system together is made of fiberboard, which is essentially pressed cardboard.
You Can Only Reposition Them a Few Times
The small print on the package will say that each piece of laminate plank is good for six repositions. This can sound like a lot, but if things aren’t coming together, you can easily use up your six tries.
You Might be Able to Fix a Small Break
When you’ve overworked the interlock, often the tongue or groove of a plank will shear off, rendering the plank useless. These planks can sometimes be saved, however, by carefully reattaching the sheared-off lip with wood glue and letting it dry overnight.
You Can Supplement the Underlayment
If you run just a few inches short on the underlayment fabric, you can avoid going out to buy more for just that little space by substituting newspaper folded to the thickness of the underlayment. They shouldn’t be more than a few inches wide.